Thursday, December 8, 2011

Fromage Fort or What to do with leftover cheese

So you've bought a wedge of brie and haven't finished it, and you have a bit of jack left from taco Tuesdays, you have a half a log of goat cheese remaining and there is just a little roquefort left over from that dinner party from last month, what do you do with all? You make a cheesy spread called fromage fort that's what you do.
This isn't a recipe as much as it is a solution to make scraps into something delicious. Take your left over bits of cheese, cutting off any unwanted mold spots you have on them, until you have about a pound of cheese remnants. Add to that 3 Tablespoons butter, 1/4 cup of white wine, a garlic clove, a pinch of herbs (today thyme) and a pinch of pepper flakes.
Chop up the cheeses into smaller pieces and place all ingredients in the bowl of a food processor with the chopping blade and process the mixture until it is smooth.
Once smooth remove and place covered in the refrigerator for at least 3 hours or better overnight so the flavors can meld together. Remember there are no set rules for the cheese ratio, just use what you got, it's all cheese and cheese is never undelicious.
You can use it as a dip, let it soften for a couple hours, it's an excellent filling for an omelette, or spread it on bread and toast it until is melty bubbly gooey goodness.

Monday, November 28, 2011

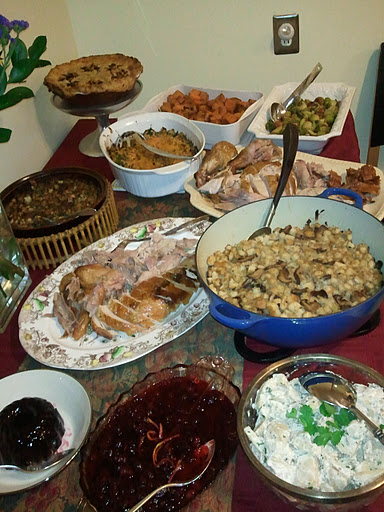
Ménage à Turkey, the Thanksgiving Three Way

It all started out innocently as my wife and I decided to host Thanksgiving, but soon it turned into not just one turkey but 3 of the big birds. We bought our first bird early. Then later in the day while shopping for other ingredients for the meal at a local grocery store we discovered that we could by 2 extra birds for $10 based on the stuffing, cream, yams, butter, etc. we were buying. My wife chimed in first, that it would be more then worth it just on using one for stock. I agreed and took it further saying we should save the breasts and sous vide them in butter. Then I thought well I might as well get a third and put my BBQ grill to work before the rainy season starts.
Tuesday - We'll start with the sous vide, Barbara did a fantastic job of butchery and removed the breast from the carcass. From there I removed the skin from the breast and divided them into 2 pieces. I then placed the breasts in a simple wet brine that I also used for the BBQ bird. Both were set in the brine for 4 hours, would have done the one for the BBQ longer but needed to have done by sundown.
I removed the skin from the breast and saved for crisping up on Thanksgiving Day. For the sous vide I combined 1/2 cup of soft butter with 2 Tablespoons of Bell's Seasoning and a teaspoon of kosher salt.
I divided the mixture in two and used each half of the mixture in one pouch with each breast and vacuum sealed and placed in the fridge until Thanksgiving Day.
Due to the threat of rain I had to BBQ the smoked bird on Tuesday. To expedite the cooking process I removed the back bone. It was brined for 4 hours, and then placed over a pan filled with a bottle of white wine, 2 wine bottles of water, a bunch of green onions, and a lemon halved and a very hot indirect fire. Grilled bird hot for about 1 hour & 45 minutes, until the internal temp reached 165. Removing the back bone took off about an hour of grilling time.

Also on Tuesday the regular roasted turkey was given its dry brine. And placed in the fridge till Thanksgiving morning.
Thanksgiving Day arrives and the the dry brined bird is removed from the fridge and its breast is buttered after resting for an hour out of the fridge. Then it was placed in a 375 degree oven for about 3 hours until it reached an internal temp of 165.
While the dry brine bird was roasting away our buttered breasts were put into the Sous Vide Supreme at 150 for about 3 hours. Then when the roasted bird finished in the oven, the breast skins were placed on a sheet pan and crisped up in the oven to add crunch to the sous vide breasts. Also cooked smoked bird was carved and placed in the sous vide supreme 30 minutes prior to eating to take the chill off the bird.
Of course since I was cooking for a group of hungry people, and making gravy, biscuits, sweet potatoes etc... I wasn't able to get a photo of the finished birds. Luckily my brother took a photo of the buffet before it was demolished. And of the three birds the one to end up on top as the taste favorite was the sous vide breast. With one guest proclaiming normally to be a dark meat fan, but was won over by the juiciness of the sous vide bird. Second was the BBQ bird, the smoky flavor added a real taste sensation, and while the roasted bird was good it was just not as good as the other two. Next year just one bird, broken down and done sous vide. Its not that we didn't love the other birds, but doing just one is a lot less complicated.

Tuesday, November 22, 2011

Easy as 3,2,1 Make Gravy

3,2,1 Make gravy.

A basic guideline for making gravy is 3 Tablespoons of flour, to 2 tablespoons of fat (butter) to 1 Cup of liquid (stock).

Step one is to melt your fat.

Step two is to whisk in your flour and cook for 3 minutes over medium high heat to cook out the raw flour taste. This hot fat paste is called a roux. You can cook it longer for a darker gravy. But the longer you cook it the less liquid it is able to hold, if you want a darker gravy add a tablespoon and 10 extra minutes to your roux.

Step three is to slowly add your liquid into the roux while whisking like mad! If you don’t keep up the maniacal whisking you will have lumpy gravy, not good. Keep it smooth by whisking hard and pouring slow.

Taste and season with salt and pepper. There your gravy is ready to enjoy. And enjoy it right away or keep on stirring until ready to enjoy.

Rubbing your Turkey or Applying the Dry Brine

Hey its Tuesday before Thanksgiving lets apply the dry brine to the bird! Everyone smile!
Here's the rub, seriously a dry brine isn't more than a rub. So rub it all over, inside and out, in between the legs and wings and don't forget the back side.
OK wrap that bird and put it back in the cooler and let the rub do its magic.

Thursday, November 17, 2011

Whiskey Sugared Sweet Potatoes Sous Vide

I don't do marshmallows, I do enjoy whiskey so this sweet potato recipe does not include fluff but is sweet on the hard stuff.
4 Sweet Potatoes
1/2 cup brown sugar
1 teaspoon salt
pinch granulated garlic
pinch granulated onions
1/4 teaspoon cayenne
1/2 teaspoon ground allspice
1/2 teaspoon cinnamon
1/4 cup American whiskey
4 tablespoons butter
1 tablespoon cider vinegar

Start by placing the whiskey in a small sauce pan and bring to a boil and reduce by half, this burns off the alcohol and concentrates the whiskey flavor.
Peel and cube sweet potatoes in 1/2 inch pieces. Combine the sugar, spices and salt mix to combine, then add the reduced whiskey to make a paste.
Pour the whiskey sugar paste over the cubed sweet potatoes and mix until the cubes are coated.
Place the whiskey sugared sweet spuds in a vacuum bag, with 4 tablespoons of butter and suck out the air.
Place in 150 F degree water bath, for an hour.
Remove the bag from the water bath, open the bag and strain the liquid from the sweet potatoes. Place the potatoes on in a sheet pan lined with either parchment paper or a silpat. And roast for 25 minutes at 400 degrees F, stirring potatoes after 15 minutes.
While sweet potatoes are roasting, reduce the reserved liquid into a thick syrup.
Place roasted sweet potatoes in bowl and coat with reduced sweet potato liquid and a table spoon of cider vinegar. Garnish with toasted pecans or few tablespoons of chopped Italian parsley, but for the love of humanity do not add marshmallows. This is an adultish side dish leave the kid stuff for dessert.

Tuesday, November 15, 2011

Brussel Sprouts w/ Smokey Bacon Sous Vide

Ok enough of the focus has been on the sous vide-ing of meat lately. Let's try our hand at one of my favorite veggies, brussel sprouts. Most people are either in the love or hate camp when it comes to brussel sprouts. My belief is you have either had them cooked properly or not. I can't think of another veggie I love more than a brussel sprout, or as they are called in the country side of Belgium, big city sprouts.

We start by cutting off the nub end and splitting them in half. Then we take some of our home smoked bacon, and crisp it up in a fry pan. Come on now this isn't a vegan blog, have to add some bacon.
While the bacon is crisping up give the sprouts some seasoning love of salt and pepper. Once the bacon is crisp, remove from heat and let cool slightly then add the bacon and its rendered fat to the sprouts with a tablespoon of extra virgin olive oil. (Added the olive oil as there wasn't a lot of rendered fat from the bacon)
Now its time suck. Vacuum seal the mixture and place in your water bath. Sous vide is a great way to cook as all the vitamins, minerals and flavor are sealed in the food, there is no leaching of beneficial nutrients or taste. I set the temp at 185 F and let cook for about 2 hours.
While the sprouts bathe, I reduced a couple of tablespoons each of balsamic and sherry vinegar, over high heat into a nice thick syrup to drizzle over the finished veg.
Here is the finished product, they suffered a little color loss, but the flavor was great and they were not mushy at all. Since they were cooked in a sealed environment they were infused with the smokey bacon flavor, that made me wonder if there is a way to graft bacon into plants while they're still growing. Next time I do 'em I would lower the temp to 170 and pull them after an hour, just to maintain a little more color.

Monday, November 14, 2011

Dry brine for Turkey

So here we are that time of year, inviting the family over to watch football, eat a large bird and hopefully not hear about Aunt Edina's varicose veins. Let's focus on the bird for now, most likely a turkey. For the last decade or so people have been stressing the soak of their Tom Turkey. I am all for the brine when it comes to smaller cuts of meat, what I have against the turkey brine is the amount of space and time it takes to make it and keep it safe. If you have a meat thermometer there is a much easier way to go in creating a tasty and moist bird. And that's a dry brine. Basically all the stuff you put in a wet brine but without the water. Here are the ingredients for our dry brine.

1/3 cup kosher salt
1/2 teaspoon celery seeds
1 teaspoon granulated garlic
1 teaspoon granulated onion
1 teaspoon fresh ground black pepper
The zest of one lemon
1 sprig rosemary
3 sprigs of thyme

Add all your dry ingredients in a bowl and finely chop the leaf bits of the thyme and rosemary. And then add to the dry ingredients.

Then zest your lemon adding the zest to the mix and stir to combine. The mixture is now ready for your bird, idealy the dry brine would be applied 36 hours before cooking. A night in advance would be sufficient. Generously coat the exterior of the bird and interior of the turkey.
Keep refrigerated, turning the turkey over at least once to distribute seasoning. Remove the bird from refrigeration at least an hour before cooking. And roast at 375 F, until the internal temperature of the thigh reaches 165 F. Remove from oven and let rest at least 30 minutes before carving.

Thursday, November 10, 2011

Lazy Lamb Sirloin Sous Vide

A few weeks back I spotted these pre-seasoned lamb sirloins and thought I'd give'm a try in my Sous Vide Supreme. A test run on being lazy by not seasoning and sealing my meat. (That sounds a bit dirty)
Since these were decent looking cuts of lamb seasoned and vacuum sealed I pick'em up to put them to the test. I knew the packaging could withstand the low temp of the lamb cooking temp, so I wasn't worried bout it losing its seal. I've seen other bloggers cooking pre-packaged beef cuts like this before, so I knew it would be ok to try.
I placed them in the water oven at 56 degrees C or about 133 degrees F and left them in there for about 4 hours. I am sure they would have been done in 2 but I had other chores to do that day, so using the laziness I mean convenience of sous vide cooking I left them standing in a perfectly cooked state till I was ready to eat them. One of the greatest joys of sous vide cookery is the ability to leave cooked food suspended in a state of readiness.
After cooking the juices had a slight milky grey color about them, but once I cut open the package there was a wonderful aroma of lamb-ie goodness, rich and meaty.
But after removing from the bag & blotting dry with paper towels you could see they retained their pink medium rare consistency all the way through. And I proceeded to heat some oil in a pan to give them a sear of two minutes per side, to get that Maillard reaction you just can't get from the bag.
Sizzle 2 minutes, flip and sizzle 2 more minutes. Then let rest a few minutes.
As you can see the lamb is a perfect medium rare all the way through and it was very tender. I strained the bag juices, and de-greased the searing pan, deglazing with a red wine before adding the strained juices and mounting with a little cold butter. Served with tarragon and dijon butter noodles, with green beans. My 91 year old father inlaw chowed down on it, and he loved the fact it was so damn tender. For me it needed a little pinch of grey salt to boost the seasoning, but it was tender and tasty. For convenience sake it was easy, taking a step out of the normal sous vide process, taste wise it was good not stellar. I wonder when sous vide cooking instructions will appear on the packaging of these type of products? It would be another way to sell it to the lazy consumer, who wants perfectly cooked meat.